Tuesday, May 25, 2010
In Case You Forgot
My blog Maggie Muggins Designs has been up and running for a while now. It has all the past posts from here up and a whole lot of new ones. If you're reading this in a reader cut and paste my site link into your subscribe box and you can subscribe quickly to my new blog: http://maggiemugginsdesigns.com/.
Wednesday, March 24, 2010
One Last Hurrah!
I hope that my disappearance from Blogtopia has not had anyone worried. I told you all to stay tuned, but that was over a week ago. A LOT has happened since then. But I'm not going to talk about it here. I'm going to tell you all about what's been going on over at my new Blog Home. Please give this Blog a sweet "virtual" hug good-bye and head on over to Maggie Muggins Designs. There you will find all of the old (I transferred the posts from this blog over) and you can discover a whole lot of new (new name, new face and new features).
*If you are following this blog in a Reader you will have to subscribe again. You can click on the feed-burner link on the right hand side to add the new blog to your list.
Farewell CyberReno's!
Friday, March 19, 2010
Kitchen Face-Lift
This site is no longer in use. You can see all this information and new posts at my new blog Maggie Muggins Designs.
So here's to the wonderful ability my husband and I have of being able to do things ourselves. I have found a place online where we can order materials to do the same thing as them. Looks like materials for the cabinet refacing will be about $1,000. As for the counter top? Well, we'd have plenty of room for splurging with the $10,000 savings! I swear I just heard my husband screaming. "Please, Heaven help me. Not another renovation. Aaahhhhh!"
Tuesday, March 16, 2010
Stay Tuned
This site is no longer in use. You can see all this information and new posts at my new blog Maggie Muggins Designs.
I'm working on some changes here so I'm sorry to all who were anticipating another post today. I got a new calling as Beehive's Advisor and I've got an exciting side project going that I'll be so excited to share soon. I just won't be sharing any crafty goodness this week. Hopefully I will be back next week in full force.
Monday, March 15, 2010
Egg Theme Week #3
This site is no longer in use. You can see all this information and new posts at my new blog Maggie Muggins Designs.
I'm so excited about this week! We have been having a blast learning about eggs, chicks, penguins and letters. My son is still pointing out every e big or little that he sees. He can also recognize g about 50% of the time. It's a letter that has a lot of variations in print so it's a little more difficult for him.
By the way - "Emperor Lays An Egg" and "Where Do Chicks Come From?" were both a little too advanced for him. But he liked the pictures anyways and I just abbreviated.
This afternoon he asked for eggs for lunch. Not unusual seeing as he did that often before this unit. I pulled them out, and got ready to cook them. My back was turned for 2 seconds and I heard a little voice proclaim "I crack the egg!" only to turn around to see a very surprised face, little hands holding the remains of a crushed egg, and a mess for mommy to clean on the floor! Oh, the joys of discovery. Did I surprise him with my calm reaction to his mess? Probably. Did I surprise myself by not busting up laughing at his priceless expression?! For sure!
So what is in store for this week?
2. Read "Horton Hatches the Egg" by Dr. Seuss
3. March 17 - St. Patrick's Day Green Eggs and Ham (note, we are going to have a surprise Leprechaun attack, even dying milk and things green, and then we're going to try to trap him)
4. Scrambled Eggs Super Video (I got it at the Library, but it's also on You Tube)
5. Balance an Egg on End for Vernal Equinox. I don't care if it's true or not, it is fun!
I'm so excited for St. Patrick's Day and for Balancing the Egg. You know my back will not be turned this time.
Sunday, March 14, 2010
This Guys Got Talent and link to Give-Away
This site is no longer in use. You can see all this information and new posts at my new blog Maggie Muggins Designs.
I was just about to post about one of our talented family friends this week for Preschool related activities when I read about his latest endeavour. This guys talent puts me to shame. Seriously. Brad of upstARTIST.org has mad skills when it comes to graphic design. My son absolutely loves his animated video-game J4NE the Pink Robot. That is actually what I was GOING to post about. It is a sweet little video game for kids to learn the alphabet with. My sons favorite letters are "V" and "K".


Don't even get me started on his paintings though. A while back I saw this painting and have been wanting it ever since.

Do you recognize it? That's Little Sal from "Blueberries for Sal"! It was one of my favorite childhood books. Brad, I want one! Can I pay you to make me one?
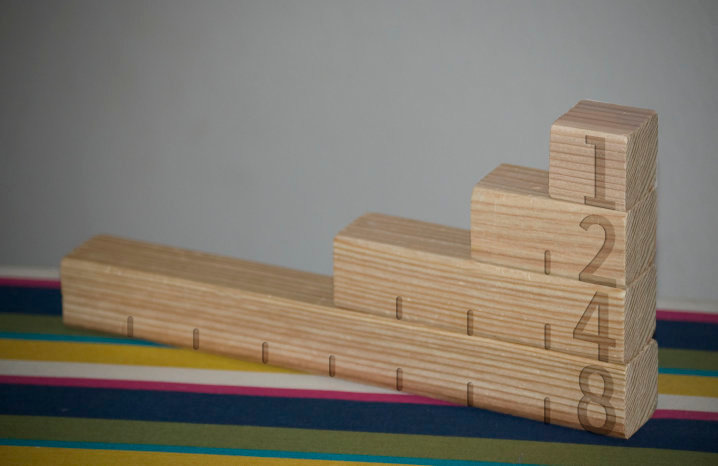
OK so here is the real reason for this post. He's entered another contest. You might remember me asking you to vote for him once before for his "Mista Barista" entry held by a Seattle TV Station last year. Did I ever tell you he won first place?! Well, he's at it again. This time he's entered a product design contest by Uncommon Goods. His product is Brainy Blocks. They are simple blocks for building and stacking, but they teach basic math and engineering skills! The best part? They are natural wood blocks! No lead scare!

You can see his video about the product here. It's a fantastic video!
Now, I want you to head on over and vote for his blocks. HURRY - the contest ends tomorrow (Monday) at NOON! Seriously, I looked at the other entries and his deserves to win! Please help him out!
To vote for him you have to "become a fan" of Uncommon Goods on Facebook here then click "like" on the Brainy Blocks Photo Album here.
Then once you've done that head on over to his cousins blog. She's hosting a give-away for him - a chance to win that "Little Sal" painting above! By voting for him you've already got yourself an entry!
Friday, March 12, 2010
Power of Moms
This site is no longer in use. You can see all this information and new posts at my new blog Maggie Muggins Designs.
As we all know, being a Mom is not the easiest task. Seriously, when my first son came along I was so unprepared for motherhood. The second time around has been much easier on me, but it still is a ton of work. It's only easier because I've got more experience. My friend April Perry started The Power of Moms a couple of years ago with her friend Saren Loosli and they just recently launched a new version! Their free site for Moms is a powerful resource for every and any kind of mother. I feel bad that it's taken me this long to share her site with the rest of you!


The Power of Moms has essays to empower you, monthly challenges and values, motherhood secrets (tips on coping from those with experience) and fabulous ideas for strengthening your family and lists of brilliant books. You'd think that was enough, but there is more to this site. I think my favorite part is their Power of Mom's Retreat for small groups of Moms. (Note: the retreats are not free.) You have the option of participating in a retreat or organizing one! I have wanted to participate in one of these retreats for a long time. April, any chance you'd come to Seattle?
Please go join this wonderful community of Moms, learn, share, participate, and enjoy. Also, please share this resource with other Moms out there. We could all be a little bit better.
Tuesday, March 9, 2010
Red Is Best
This site is no longer in use. You can see all this information and new posts at my new blog Maggie Muggins Designs.
I have a little kid piano from Craigslist. This weekend, while out painting something else, it seemed like as good of a time as any to get this project complete as well. It's only been on my list for a year. OK, I lied. It's been closer to two years.
The $30 Jaymar Piano courtesy of Craigslist.


I taped off the keys and had at it. Here it is with a new coat of paint courtesy of Krylon.


I plan to put some cute black vinyl saying or image on the front. I was going to do white, but realized that would make the keys look even more old and yellow than they already do. I love it so much now, as does my son. He's thrilled to have it back in the house. The other kid piano we have was put out of his reach. He kept climbing up on top of it. By the way, it cost me $5 on Craigslist! Patience pays off! The red one will go up there beside it later on, when the kids no longer play it.


I'm linking this up to DIY Day, Trash to Treasure, Get Your Craft On and Look What I Made and Show and Tell.


Monday, March 8, 2010
Home Preschool: Egg Week #2
This site is no longer in use. You can see all this information and new posts at my new blog Maggie Muggins Designs.
Wow - I survived my first week of home preschool! I'd like to say the first week went smoothly, but we never did get to the Humpty Dumpty video. I'll be doing that today with another activity.
As for the other activities, let me fill you in! My son loved the coloring page and can now find both big and little "E" on everything. This morning I was using E6000 to glue a waterfall image back onto a piece of his train track. He stood beside me shouting "Big E, Momma! Big E!" the whole time. I'm so proud of him.
Thursday we had one of his friends over to float the egg together. I got out 2 glasses and filled them 2/3 full with water. We asked them if the eggs would sink or float and they said sink. So we {gently} popped in the eggs and sure enough, they sank. Then we told them by adding salt we could make them float. This is where it got really fun. We started adding salt, but after adding quite a bit, I thought maybe it needed a stir. We got little sticks and the kids stirred. The eggs still didn't float. I had no idea that you needed SO MUCH SALT to get those eggs to float. By the way, you don't have to worry about water spilling over, salt makes the water more dense, so the water line does not rise at all. When the eggs finally started going up the kids got so excited. Then we let them poke at the eggs for a few minutes, popping them back down to watch them float back up! It was so cute.
By the way, I plan one short activity for each day, but you don't have to do it that way. You can combine some and only do 2 or 3 days each week. It just depends on your preference. So here are the activities planned for this week.
2. Read "Emperor Lays An Egg" by Brenda Z. Guiberson
3. Read "Where Do Chicks Come From?" by Amy E. Sklansky
4. Green Eggs and Ham Video, Letter G Coloring Sheet
5. Peek-a-boo Egg Craft
Have fun this week! My son has enjoyed our activities so far. This morning we did the first activity already and he kept asking for it again and again. He's got big G and little g down!
Tuesday, March 2, 2010
Toddler Tool Box
This site is no longer in use. You can see all this information and new posts at my new blog Maggie Muggins Designs
.My toddler got a set of tools for Christmas that came with a very awkward back pack. You know the set? Anyhow, I wanted him to have a tool box to carry the tools in. Something like Handy Manny's but not one that would scratch the floors, or be easily smashed into my shins. No thanks. So I came up with a fabric box. Next time I make it I'll post a better tutorial, but for those of you that don't need too much direction I'll post the dimensions.

Fabric Pieces:
6 of 6"x10" for Sides and Bottom
4 of 9"x6" for Ends
Fusible Fleece (or Quilt Batting) Pieces:
3 of 6"x10"
2 of 9"x6"
Directions (1/2 inch seams, Serged or Zig-Zag Edge)
1. Fuse the fleece to all outer pieces.
2. Trim the top of all end pieces to an angle (I did a 60 degree angle)
3. Sew all outer pieces together - I did the bottom and sides first, then the ends. Turn it out and make sure all the seams look good on the outside.
4. Sew all inner pieces together.
5. Put inner and outer boxes together right side together. Sew around the top leaving a 2-3 inch space on one side to pull the bag through.
6. Pull the bag through and make sure get the edge seams flat, tuck in the raw edges of the hole, then top stitch around the entire top.
7. Cut a hole in the ends where you want to put the grommet, install grommets as directed on package. (Extra-Large ones from Jo-Anns.)

8. Cut a piece of 3/8" dowel 9.5 inches long. Sand it a little.
9. Cut a piece of 3/8" plastic tubing (PVC) 8 3/4" long. Push it over the dowel as shown below. *My Dad was brilliant and came up with this idea (it keeps the ends from going in to the center.)
10. Drill holes in the ends of the dowels for your screws.

*Note: I painted this using Krylon Plastic Paint. Big Mistake. It didn't dry properly so the handle is sticky. Permanently.


Let me know if you have any questions or something needs clarification.
I'm linking this up to DIY Day at A Soft Place to Land, Get Your Craft On at Today's Creative Blog and Look What I Made at Creations by Kara.
Monday, March 1, 2010
Home Preschool
This site is no longer in use. You can see all this information and new posts at my new blog Maggie Muggins Designs.
I've decided that instead of sending my son to preschool this year we are going to do preschool at home. We want to save the money from preschool to put him into music lessons, swimming, karate, and other various activities. So in an effort to be organized and do this right I emailed my Mom. As a retired Kindergarten Teacher she is an excellent resource. She suggested working on one theme each month and finding the resources locally, online and around the home to teach them about that theme. Here are her theme suggestions for those of you wanting ideas for yourself.
All about me: September/ October
1. Safety
2. Body - Healthy Eating - fruits, vegetables, grains, etc.
3. Fall
My family and community: November/ December
1. All about my family and community/ Pets/ Farm Animals
2 Gratitude - Thanksgiving - I am thankful for fruits, veggies, family, etc.
3. Christmas + Service
My friends and community January/ February
1. Winter/ Snow/ Penguins
2. Friendship/Sharing
3. Valentines
The World around me March/ April/ May/ June
1. Life cycle - Eggs
2. Spring/ Easter/ St. Patrick's Day
3. Rain / Water cycle / Rainforest/ Jungle
4. Flowers - Another cycle
5. Bugs
6. The Sea and sea Creatures
7. Summer
In an effort to organize myself a little bit better I plan to post every week with my plans for the week. Each month I will choose a new theme. Keep in mind, my son is going to turn 3 soon so I will be keeping the activities at a basic level.
Eggs
This month we are going to learn about Eggs. Spring is early here so I felt it was a good theme to learn right now. We'll color, read books, find information online, have green eggs and ham for St. Patricks, and oh so much more! It's perfect as a preparation for Easter too.
Here's what I've got ready for my son for this week:
1. The Letter "E" Coloring Page, Talk about E and it's sounds
2. Read "Green Eggs and Ham" by Dr. Seuss
3. Float an Egg
4. Watch a Humpty Dumpty video and learn the rhyme.
5. Reading time - search for the letter E in the books we read
That's my plan for this week. I'm ordering some books from our library and I'm going to look around to see what else I can find. Feel free to post your ideas, links and activities. For those of you that want to join along on our Preschool adventure please feel free to comment or even contact me via email with your suggestions!
Saturday, February 27, 2010
Fabric Covered Cork Boards
This site is no longer in use. You can see all this information and new posts at my new blog Maggie Muggins Designs.
For almost my entire life, in every (OK, two) home I can remember we have had a giant bulletin board over the kitchen table. I'm not talking large, I'm talking massive. Bigger than the table! It was always crowded with papers, notes, bills, phone numbers, emergency lists, and then some. I think it was how my Mom managed any inkling of sanity with her 4 busy children.


 I added a pocket to one of the boards. I used got two pieces that were just over 1/3 of the height of the boards and ironed fusible fleece to one piece. I sewed the right sides together, turned them, top-stitched the top of the pocket and then sewed it to the fabric around the edges and a few rows for different size pockets. Then I stapled the piece on just like the other boards.


BEFORE:

So in my teens one day I realized that this board was not normal. That and it was an eye-sore. I think that's about the same time I started to develop a passion for home decor. I vowed to one day convince my Mom to take it down. So now years later, with children of my own and a need for my own humongous bulletin board (which I never would do) I finally found a way to convince her to remove it. For her birthday last year I gave her new covered cork boards. Only, it took me a long time to figure out how I wanted to make them, pick fabric with her, and complete them.
She didn't want framed boards so I found the easiest boards to cover. I wanted something that would last for a while. I found 14"x14" unframed cork boards at Jo-Anns and slowly purchased 6 of them with my 40% off coupons. You can also see them here. They cost more, but I think it was worth it for the way they are covered.

Due to the funky print and the fact that I wanted a smooth soft look on the boards I ironed the fabric flat and then ironed on some fusible fleece. This is my favorite thing to use instead of quilt batting. It worked a lot easier because it's ironed to the fabric so it didn't shift very easily.
I cut the fabric to about 17"x17" and stapled it to the back. I started in the middle on all 4 sides and then worked my way around the edges. This kept it from shifting and pulling too much. I think they turned out fabulous!
 I added a pocket to one of the boards. I used got two pieces that were just over 1/3 of the height of the boards and ironed fusible fleece to one piece. I sewed the right sides together, turned them, top-stitched the top of the pocket and then sewed it to the fabric around the edges and a few rows for different size pockets. Then I stapled the piece on just like the other boards.
Ah, there it is again, my lovely new rug. Loving it.
They chose to hang only 5, my Dad just nailed them into the wall using his nail gun. But the best part of it all is it inspired my parents (that and the need to paint to cover a hole in the wall) to try wainscoting (or bead-board) on the kitchen walls. I think the room looks a whole lot better.
AFTER:


I'm linking this up to Thrifty Decor Chick's Before and After Party!
Subscribe to:
Comments (Atom)


